 *
*
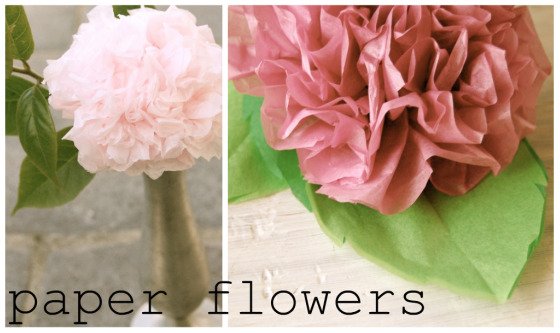
i was completely inspired by this post via pretty good. i’ve been creating all sorts of paper flowers this week. I looked at a tutorial online, but ended up using the method i remember from elementary school. here’s how it works…
*
*
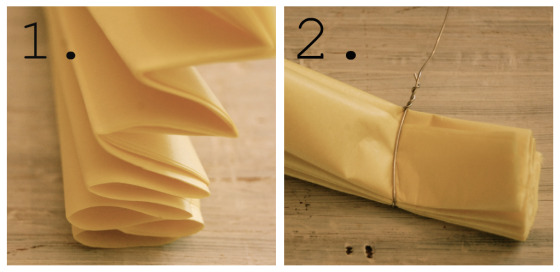
1. begin with at least 6 sheets of tissue paper, cut to 8″x16″. accordian fold the entire length of the sheets.
2. wrap a wire around the middle of the folded tissue paper leaving about 8″ of wire for the stem.
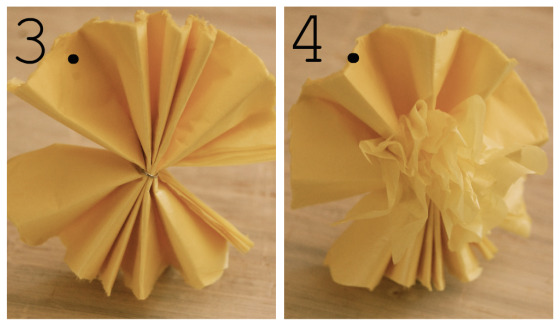
3. let tissue paper unfold a bit.
4. begin to separate each sheet of tissue paper giving lots of depth and texture. this part isn’t hard, it just requires patience and gentle fingers.
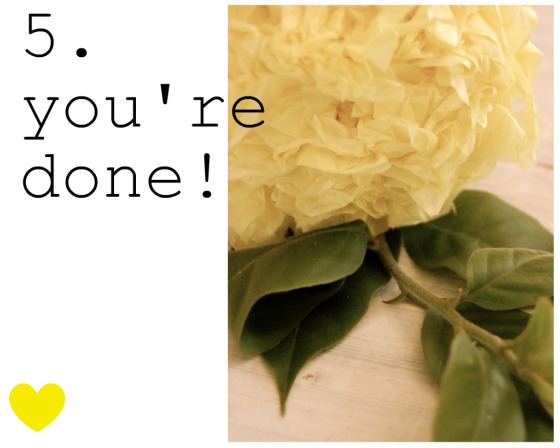
5. wrap stems with floral tape, if you’d like. place in a vase with real leaves or use as a gift topper.
***
get creative!


Thanks so much for this! Put in “paper flowers” and found this link under the image tab on Yahoo! Search. I’m getting married in July and this looks like a fun project to get the girls together for!
Lovely – I used to make these with my nan out of facial tissues in pastel colours – thanks for the memories. We did cover the wires with the green tape that florists use.
I think we will be doing this with my guide unit in the Spring. http://taverhamduckydiaries.blogspot.com/
I wish I was crafty!
gorgeous! I’d love to try and make one.
You can also buy tissue paper that is water color tissue paper. It bleeds when you get it wet and makes tons of beautiful tied dyed looking prints and colors. It would make some funky flowers! Flower power!
THANK YOU THANK YOU THANK YOU!
I love the flowers and I made already some…
You’re great!
This is the flower my grandmother used to make with facial tissue! I’ve made many of these all thru
my life and taught my grandchildren how to do them as well. It’s still just as pretty as it was over
50 years ago. Try lightly touching the edge of the flower “petals” with various color marking pens. The ink “bleeds” into the paper and gives a nice effect. I’m happy to see that these are still around.
Oh, wow! I can’t wait to try this. Just recently I was wanting to make these for my little Charlotte’s 3rd Birthday but couldn’t find simple directions….hmmm… maybe for Thanksgiving?!? Thanks so much!
Wow..does that ever bring back memories! My uncle used to own a bakery and a catering hall and I remember being very young (like kindergarten and younger) and helping to make these to decorate for events happening there. So that tells you how easy it really is! I used to love to pull up the tissue paper and crumple and watch the flower start to emerge.
I made hundreds of these for my wedding this past summer. I glued them to a styrofoam ball and they were the aisle decorations. I also glued them to the letters “M” and “B” for mine and my husbands first initials. They served as the door decorations for the church. So pretty, by my gracious, SO much work!
Really? That easy? So pretty, will have to try making some!
Delightful and sweet – just like you!
xoTiffany
P.s. I can’t wait to order a necklace… soon VERY soon!
Very pretty!
Wow! These look AWESOME! I’m bookmarking this…I made mine using the Martha Stewart kit, but these look so easy (and just like peonies…my favorites!!)
You make it look so easy! Thanks! 🙂
Reminds me of putting together the homecoming float in high school! I forgot about these until just now, thanks for the great project!
Beautiful! They look like Peonies!
Oh, Lisa, how lovely! I’ve been trying to figure out how to make paper flowers. I’ve bookmarked this so I can try it soon! =)
Yay, this is exactly what I was looking for. My daughter and I are going to make a bunch and put them in a big jug in her room, lots of flowers to look at without the chance of spilling water. Thanks so much.
So cool, I could definitely see doing this with gifts.
Beautiful! I may have to try making some for a Thanksgiving centerpiece. Great idea!
good tip mrs. bagley! i also, zig zagged some edges like sweet williams. so fun!
One more tip- Once you have the sheets folded, cut the ends so that they’re rounded. It makes lovely scallops- petals even!